Introduction
As a University graduate student and teaching assistant, I have to attend and teach classes. Due to the events of the COVID-19 pandemic, classes have now moved mostly online. Zoom just happened to be the platform of choice where most classes are being hosted.
Back when I physically attended classes, I was that one student who sat in the front row and recorded every lecture. I don't really go back and listen to them, but they are useful if you forgot details about an assignment or if you wanted to double check the due date on an assignment being changed. Though, to me, the main reason was data. I wanted data... and I wanted as much as possible. When I teach, I also record everything. No matter the perspective, online classes make this much much easier.
So, what did I do? My usual. Made a completely overkill setup to preserve as much data as possible and accomplish the ultimate Zoom lecture recording. Speaking dramatically aside... Before I get to discussing the details on the setup, let's talk about Zoom and some technical details about it. This'll be important for later on.
Zoom technical details
Audio
Zoom gives quite a convenient feature set. You are allowed to have it automatically record a meeting to your disc (or the cloud). In addition, you can have it export every speaker as their own separated audio track. It's not lossless, but any kind of audio separation is very useful in post.
Let's look at it in detail. This is the FFmpeg information for a sample file recorded via Zoom:
Input #0, mov,mp4,m4a,3gp,3g2,mj2, from 'audio_only_Clara_Nguyen.m4a':
  Metadata:
    major_brand      : mp42
    minor_version    : 0
    compatible_brands: isommp42
    creation_time    : 2020-03-24T02:47:41.000000Z
  Duration: 00:00:04.70, start: 0.000000, bitrate: 57kb/s
    Stream #0:0(und): Audio aac (LC) (mp4a / 0x6134706D), 32000 Hz, mono, fltp, 54 kb/s (default)
    Metadata:
      creation_time   : 2020-03-24T02:47:41.000000Z
      handler_name    : AAC audio
Ok, so we have AAC audio here. It is at 32,000 Hz which is unfortunately lower than what I would've expected. For comparison's sake, normal audio is either at 44,100 Hz or at 48,000 Hz (Discord is at 48,000 Hz). But, again, each track is separated. I'd take that at this sample rate over a single mono track with everyone mixed in.
Unfortunately, this isn't just Zoom's recorder. If the meeting is recorded via OBS or Audacity to a lossless audio track (e.g. FLAC), the quality of the audio sent over is compressed to the same level. This can be observed by looking at the spectrogram of both tracks, shown below:
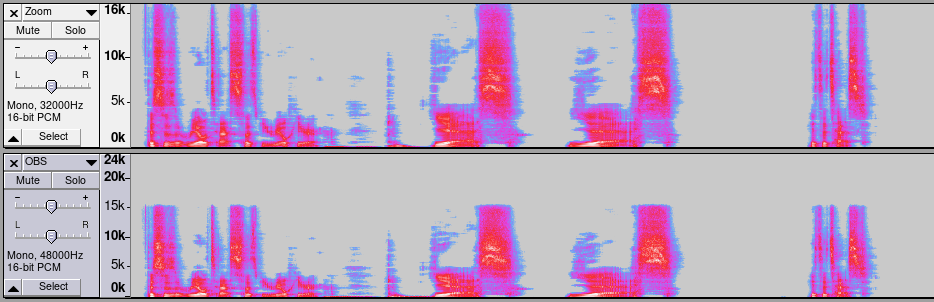
Be aware that the peak of the spectrogram is the sample rate / 2. The bottom track looks smaller because it goes up to 24k (48,000 Hz) rather than 16k (32,000 Hz). The two tracks are the same otherwise.
Video
Now, let's look at video. Here is the FFmpeg output for a sample recording:
Input #0, mov,mp4,m4a,3gp,3g2,mj2, from 'zoom_0.mp4':
  Metadata:
    major_brand     : mp42
    minor_version   : 0
    compatible_brands: isommp42
    creation_time   : 2020-03-24T02:47:39.000000Z
  Duration: 00:00:04.88, start: 0.000000, bitrate: 677 kb/s
    Stream #0:0(und): Video: h264 (High) (avc1 / 0x31637661), yuv420p, 1280x720, 619 kb/s, 25 fps, 25 tbr, 30k tbn, 60k tbc (default)
    Metadata:
      creation_time   : 2020-03-24T02:47:39.000000Z
      handler_name    : H.264/AVC video
      encoder         : AVC Coding
    Stream #0:1(und): Audio: aac (LC) (mp4a / 0x6134706D), 32000 Hz, mono, fltp, 55 kb/s (default)
    Metadata:
      creation_time   : 2020-03-24T02:47:39.000000Z
      handler_name    : AAC audio
The video is 720p at 25 fps and has a single mono audio track with everyone's voices mixed. This is quite a disappointment... but it works I guess.
If you are a student viewing a lecture, unfortunately this quality is the best you are going to get. However, for me, I teach courses. Since this is the case, we can do better... much better. It is my screen being streamed over to tens of students at once. As such, I can record via Zoom and another screen recorder simultaneously, giving me more quality and full control over the recorded content.
This is where I step in...
Software Setup
What I want in the final video
Here's a checklist of the features I want in a lecture recording. If you've seen how I archive game footage, this shouldn't be much of a surprise.
- Video: Video track at full resolution (not downscaled in any way). 60 FPS (or higher if your monitor allows).
- Audio: Desktop Audio in lossless quality (FLAC S24 @ 48,000 Hz. 7.1 Surround).
- Audio: Microphone in lossless quality (FLAC S16 @ 48,000 Hz. Mono/Stereo depending on microphone used).
- Audio: Separate, perfectly aligned audio tracks for every other participant in the meeting that has spoke (M4A/FLAC S16 @ 32,000 Hz. Mono).
- Misc: Chat log saved as attachment in final video file and used to generate SRT subtitles.
- Misc: Timestamps of Video Start Date (nanosecond precision)
Software
When I record my lectures, the following software is used:
- Zoom - Sending content over to students, records a video (I guess), as well as all audio tracks separated.
- OBS (Open Broadcaster Software) - Records video at whatever settings you want (Full resolution). Records desktop audio and microphone at lossless quality.
Recording Procedure
Alright, time to get recording. Host the lecture and hit the record button on both OBS and on Zoom. Record with Zoom first. End the Zoom recording last. This is so the recorded audio tracks are guaranteed to fit within the recorded OBS video/audio stream. In a simple numbered list:
- Start recording with Zoom
- Start recording with OBS
- Lecture away, I guess
- Stop recording with OBS
- Stop recording with Zoom
Really, the recording procedure of this is the easiest part. After all, this post is about the procedure that takes place post-lecture.
Realign Audio Tracks
Now for the fun part. Let Zoom encode the files it recorded locally. You will see files in the following directory structure:
Audio Record/
    audio_only_Person 1.m4a
    audio_only_Person 2.m4a
    audio_only_Person 3.m4a
    ...and so on.m4a

audio_only.m4a
chat.txt
playback.m3u
zoom_0.mp4
Install Audacity as well as its FFmpeg module. This will ensure that you can import files with no issues. When that's done, import the Desktop Audio from the OBS recording into Audacity. This is our reference track that we will use to align the Zoom audio files. Then, import all of the audio tracks in the Audio Record directory. This is not an Audacity tutorial. I'll leave it to you to figure out how it works.
As audio tracks begin to be aligned, we come across the first problem with Zoom recordings. Yes, every person's audio track is separated. However, one thing Zoom doesn't do is auto-align them. We have to do that ourselves. Thanks Zoom...
Here is what I mean. For reference, the top track is the reference track from OBS and the bottom track is someone's voice track from Zoom.
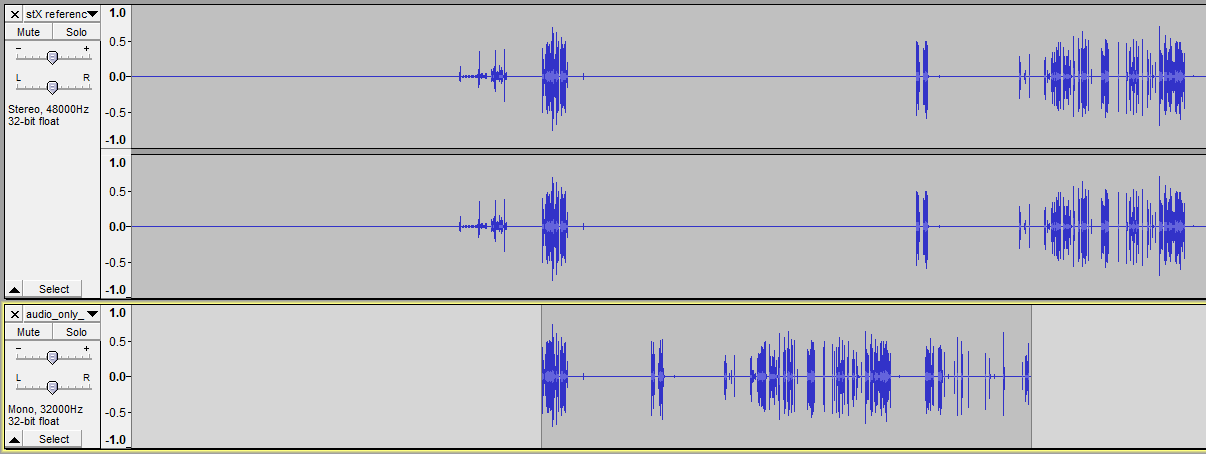
My favourite way around this is to click a silent part of the voice track and press Ctrl + I. This will split the track and let you drag separate parts. In the case of the screenshot above, I actually had to split this audio twice to form 3 segments. Use your eyes and zoom in to make sure they are perfectly aligned.
In the end... it should look like this for a single audio track:
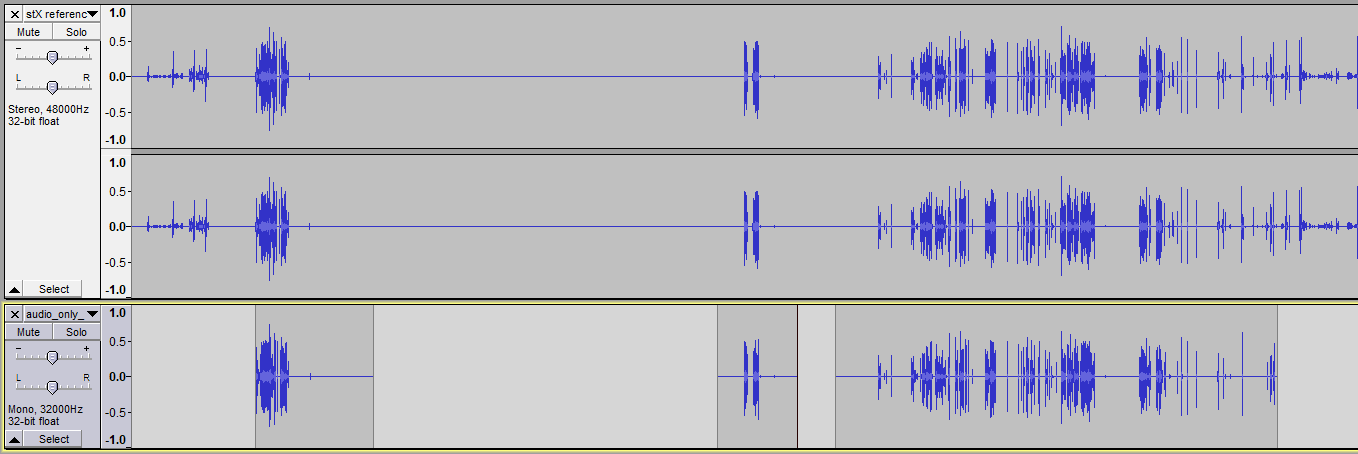
Great! Now let's do this for all of the other speakers in the lecture. This can get tedious depending on how many speakers you have. The lecture I gave for this example didn't have many speakers thankfully (despite lasting almost 5 hours), so it ended up looking like this:
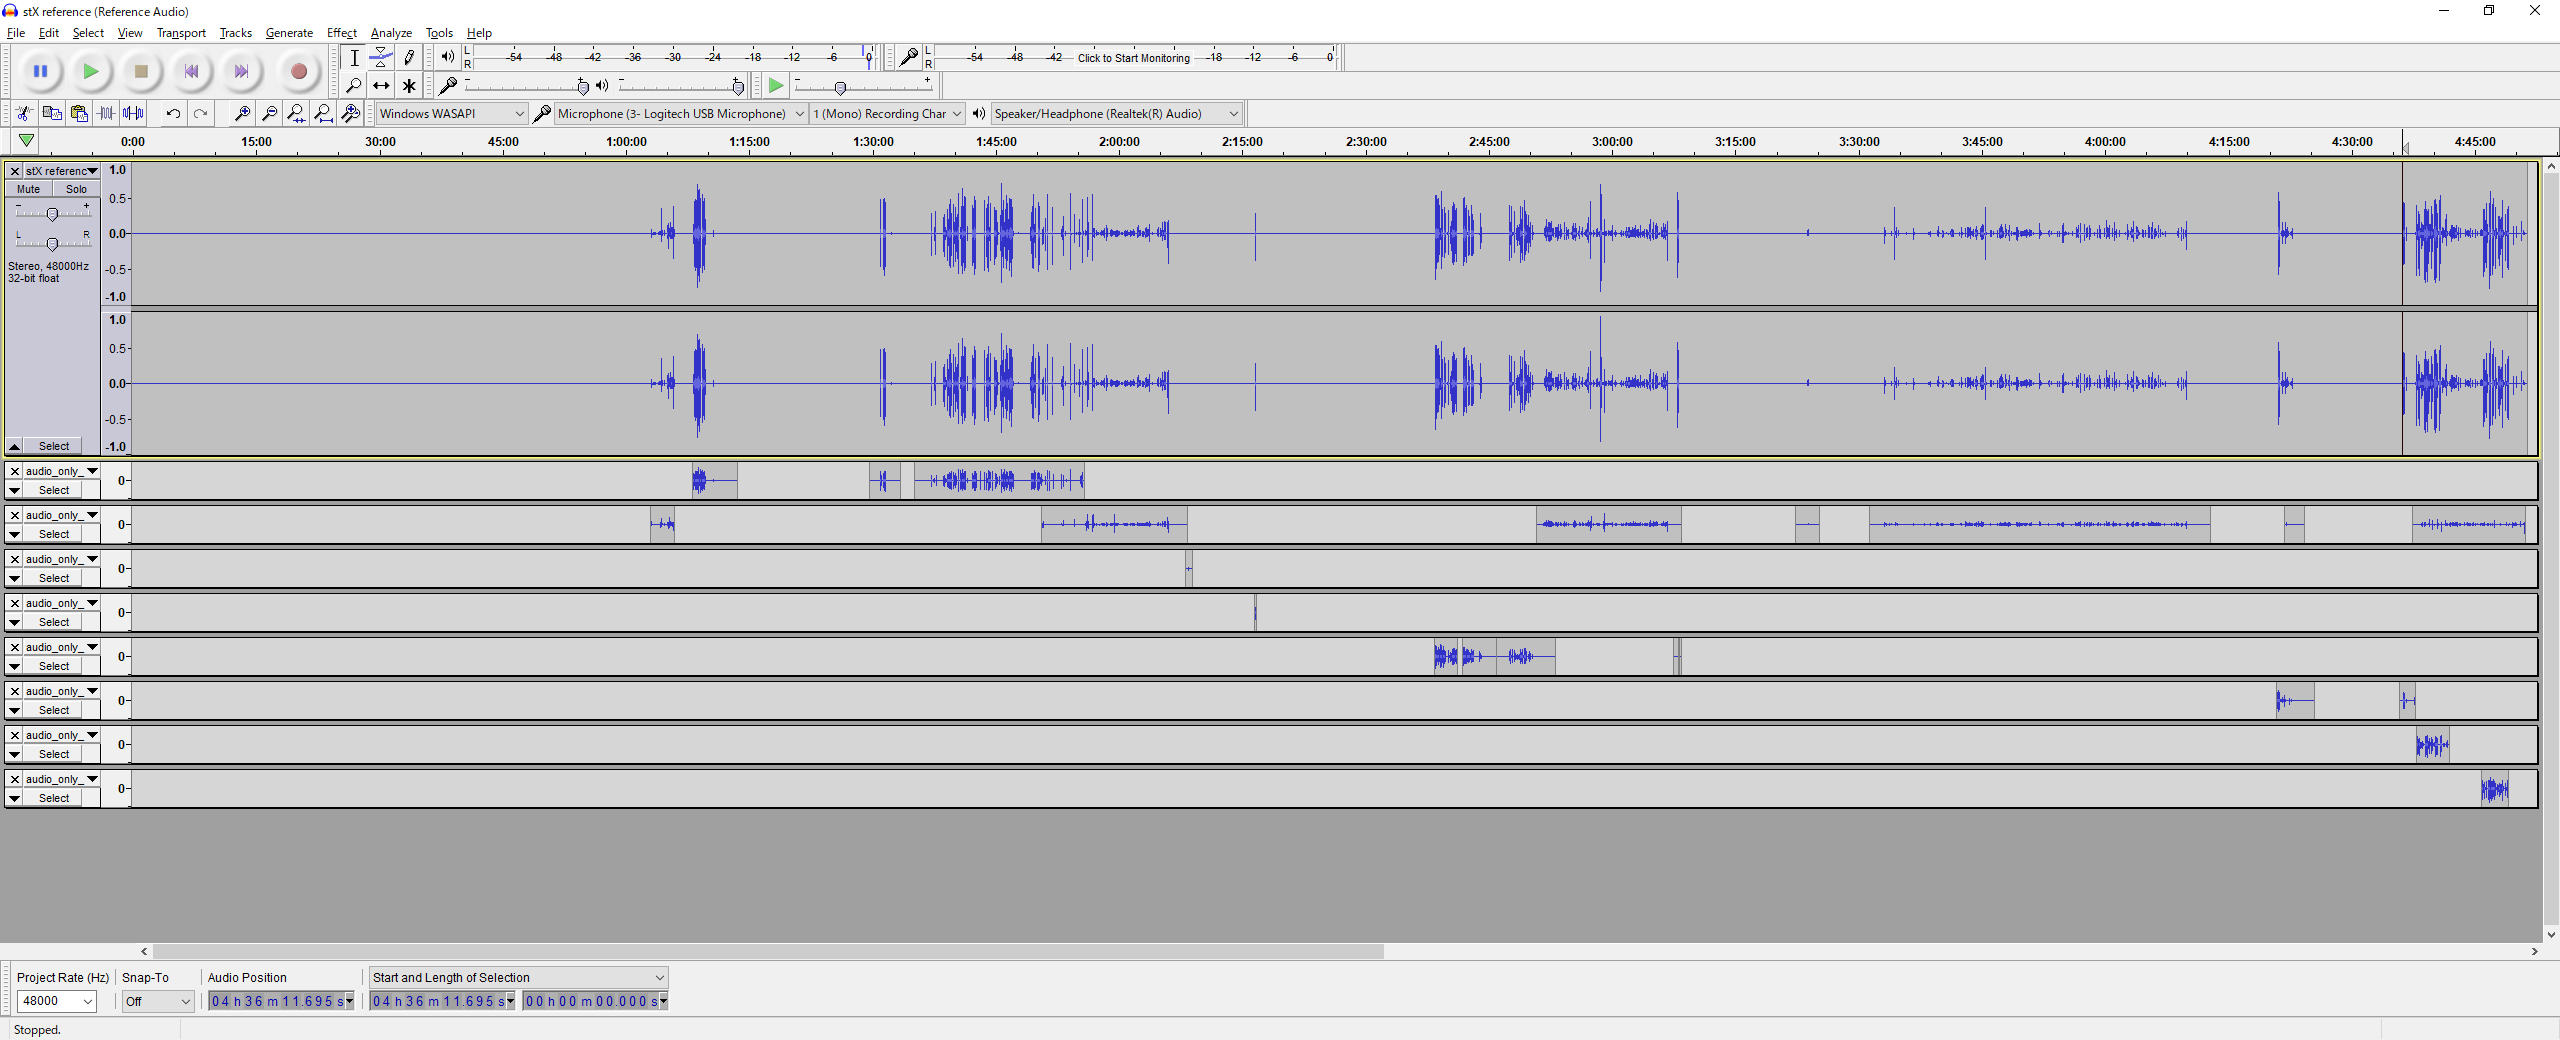
Based on the screenshot above, this is almost ready for export. Before doing so, eliminate all of those empty gaps between all of the tracks (the silent parts with no waveform). This can be done by highlighting those parts and then going to Generate -> Silence. We need this because otherwise Audacity will not export them with the aligned timing shown.
Once that's done, delete the reference track from Audacity. Set the sample rate at the bottom left of Audacity to 32,000. Then, go to File -> Export -> Export Multiple.... This will have each track exported to a directory of our choice. Export as FLAC to prevent any further quality loss.
Remux all tracks into a single MKV master
Install git bash and make sure ffmpeg is a valid
command. It's time to put all of the audio tracks and the OBS video into a
single file. I have written a script for this which you can grab here:
compile.sh.
It takes the following syntax:
UNIX> ./compile.sh video_file audio_dir chatHere's some information about the arguments passed in:
-
video_fileis the OBS video file. Make sure this is the original file where the timestamps are untampered. The script extracts the creation of the file and stores it in the final file asDATE_RECORDEDmetadata. This may be used with the chat log to create subtitles. -
audio_diris the directory storing the audio files that were exported via the procedure above. Rename the files to havestXat the beginning whereXis the number of the track. This is so you can control the order in which the tracks appear in the final MKV.
An example of this structure may look like:
Directory Structurest0 Voice - iDestyKK.flac st1 Voice - Person 2.flac st2 Voice - Person 3.flac st3 Voice - Person 4.flac st4 Computer Audio.flac st5 Reference.flac -
chatis simply the path to a chat.txt file. It will be added into the final MKV file as an attachment.
final.mkv. So run the script and then check your directory for
that file.